引言
TLS1.2 发布于 2008 年 8 月,至今正好有 10 年,随着互联网安全越来越受到重视,新协议 TLS1.3 呼之欲出。值得一提的是,从第一份草案编写至今,已经有几年时间了,截止这篇文章编写,已经是第 28 份草案。在最近的 Chrome 版本更新中也逐步对 TLS1.3 进行支持,Chrome 65 开始默认开启 draft 23、Chrome 68 开始支持 draft 28
更新:TLS 1.3 标准已于 2018 年 8 月正式发布为 RFC 8446 ,距 TLS1.2 发布正好 10 周年
TLS1.3 对于 TLS1.2 有重大改写,既提高了安全性又提高了速度,以至于有争议称,应该把它叫做 TLS2.0
关于 TLS1.3 的科普可以看下面的页面
https://wiki.openssl.org/index.php/TLS1.3
https://zhuanlan.zhihu.com/p/28850798
之前我也写过 Nginx 的 https 的配置 https://zhih.me/nginx-http2-https/ ,当时是使用 TLS1.2 的
碰巧前几天发现 .ooo 可以免费用 1 年,就撸了一个 onmp.ooo 来做为我 onmp 项目的页面,把它搭在 4 刀年付的 virmach 上,顺便测试 TLS1.3
一键安装
最近更新支持防火墙功能,详情可以看 https://zhih.me/ngx-lua-waf/
sh -c "$(curl -kfsSl https://raw.githubusercontent.com/xzhih/nginx-compile/master/install.sh)"
|
安装
我这里用的系统是 Debian 8
安装依赖
apt-get install git gcc make build-essential -y
|
下载源码
我们把源码全都放在一个地方,方便使用,创建 nginx 的运行用户 www-data
rm -rf /usr/src/ mkdir -p /usr/src/ mkdir -p /var/log/nginx/ useradd -s /sbin/nologin -M www-data |
克隆 OpenSSL
这里用的是 1.1.1 稳定版的源码
cd /usr/src wget https://github.com/openssl/openssl/archive/OpenSSL_1_1_1.tar.gz tar xzvf OpenSSL_1_1_1.tar.gz mv openssl-OpenSSL_1_1_1 openssl |
下载 Nginx 的源码
cd /usr/src/ wget https://nginx.org/download/nginx-1.15.6.tar.gz tar zxf ./nginx-1.15.6.tar.gz mv nginx-1.15.6 nginx |
克隆 zlib
开启 gzip 要用到 zlib 库,这里使用的是 Cloudflare 优化的版本,比原版具有更高的压缩性能
cd /usr/src/ git clone https://github.com/cloudflare/zlib.git zlib cd zlib make -f Makefile.in distclean |
克隆 Brotli
就像 gzip 一样,Brotli 也是一种压缩算法,它是由谷歌开发的一个更适合文本压缩的算法,因为它使用了字典,所以有更好的压缩比。
现在主流浏览器都已经支持 Brotli 了,而且也能与 gzip 共存,如果浏览器支持 Brotli 就会优先使用,所以可以放心兼容性,可以在这里看到支持的数据 https://caniuse.com/#search=Brotli
cd /usr/src/ git clone --recursive https://github.com/google/ngx_brotli.git |
我给 nginx 默认配置的 Brotli 压缩等级为 6 级,这对于动态内容比较友好,如果你是像我现在这个博客一样是静态化的,那么建议开启 11 级压缩,这样可以获得最好的体验
下载 PCRE
nginx rewrite 模块需要 pcre 库
cd /usr/src/ wget https://ftp.pcre.org/pub/pcre/pcre-8.42.tar.gz tar zxf ./pcre-8.42.tar.gz |
给 OpenSSL 打补丁
补丁来自:https://github.com/hakasenyang/openssl-patch
此补丁的目的是让 OpenSSL 支持 TLS1.3 的 23,26,28 草案,以及 Final 版标准
cd /usr/src/ git clone https://github.com/hakasenyang/openssl-patch.git cd /usr/src/openssl patch -p1 < ../openssl-patch/openssl-equal-1.1.1_ciphers.patch patch -p1 < ../openssl-patch/openssl-1.1.1-chacha_draft.patch |
给 Nginx 打补丁
补丁来自:https://github.com/kn007/patch
nginx 补丁
- 添加SPDY支持。
- 添加HTTP2 HPACK编码支持。
- 添加动态TLS记录支持。
nginx_auto_using_PRIORITIZE_CHACHA 补丁
- 支持时使用 SSL_OP_PRIORITIZE_CHACHA
cd /usr/src/ git clone https://github.com/kn007/patch.git nginx-patch cd /usr/src/nginx patch -p1 < ../nginx-patch/nginx.patch patch -p1 < ../nginx-patch/nginx_auto_using_PRIORITIZE_CHACHA.patch |
使用 jemalloc 作为内存管理
cd /usr/src/ wget https://github.com/jemalloc/jemalloc/releases/download/5.1.0/jemalloc-5.1.0.tar.bz2 tar xjvf jemalloc-5.1.0.tar.bz2 cd jemalloc-5.1.0 ./configure make && make install echo '/usr/local/lib' >> /etc/ld.so.conf.d/local.conf ldconfig |
其他编译配置
Nginx 默认会以 debug 模式编译,我们需要注释掉 /usr/src/nginx/auto/cc/gcc 中 CFLAGS="$CFLAGS -g" 这行,这样可以减少生成文件的大小
sed -i 's@CFLAGS="$CFLAGS -g"@#CFLAGS="$CFLAGS -g"@' /usr/src/nginx/auto/cc/gcc
|
编译安装
cd /usr/src/nginx ./configure \ --user=www-data --group=www-data \ --prefix=/usr/local/nginx \ --sbin-path=/usr/sbin/nginx \ --with-compat --with-file-aio --with-threads \ --with-http_v2_module --with-http_v2_hpack_enc \ --with-http_spdy_module --with-http_realip_module \ --with-http_flv_module --with-http_mp4_module \ --with-openssl=../openssl --with-http_ssl_module \ --with-pcre=../pcre-8.42 --with-pcre-jit \ --with-zlib=../zlib --with-http_gzip_static_module \ --add-module=../ngx_brotli \ --with-ld-opt=-ljemalloc make make install |
Nginx 的可执行文件安装在 /usr/sbin/nginx ,Nginx 配置在 /usr/local/nginx/conf/ 里
配置
Nginx 已经安装上了,现在我们来配置网站,让它跑起来
Nginx 全局配置
把以下内容覆盖填入 /usr/local/nginx/conf/nginx.conf
user www-data; pid /var/run/nginx.pid; worker_processes auto; worker_rlimit_nofile 65535; events { use epoll; multi_accept on; worker_connections 65535; } http { charset utf-8; sendfile on; aio threads; directio 512k; tcp_nopush on; tcp_nodelay on; server_tokens off; log_not_found off; types_hash_max_size 2048; client_max_body_size 16M; # MIME include mime.types; default_type application/octet-stream; # Logging access_log /var/log/nginx/access.log; error_log /var/log/nginx/error.log warn; # Gzip gzip on; gzip_vary on; gzip_proxied any; gzip_comp_level 6; gzip_types text/plain text/css text/xml application/json application/javascript application/xml+rss application/atom+xml image/svg+xml; gzip_disable "MSIE [1-6]\.(?!.*SV1)"; # Brotli brotli on; brotli_comp_level 6; brotli_static on; brotli_types text/plain text/css text/xml application/json application/javascript application/xml+rss application/atom+xml image/svg+xml; include vhost/*.conf; } |
Nginx 站点配置
我们已经在全局配置里设置了包含 /usr/local/nginx/conf/vhost/ 目录下的 conf 文件
mkdir -p /usr/local/nginx/conf/vhost/
|
然后在 /usr/local/nginx/conf/vhost/ 里创建站点配置,比如我的是 onmp.ooo.conf
server { listen 80; server_name onmp.ooo; root /wwwroot/onmp.ooo; location / { index index.html; } } |
这样 HTTP 的站点配置就弄好了,不过还站点还没页面,我们把 Nginx 的欢迎也面给放进去
mkdir -p /wwwroot cp -r /usr/local/nginx/html /wwwroot/onmp.ooo # 配置站点目录权限 chown -R www-data:www-data /wwwroot/ find /wwwroot/ -type d -exec chmod 755 {} \; find /wwwroot/ -type f -exec chmod 644 {} \; |
service 配置
service 命令用于对系统服务进行管理,比如启动(start)、停止(stop)、重启(restart)、查看状态(status)等,我们是编译安装的,所以要手动创建服务文件。
mkdir -p /usr/lib/systemd/system/
|
编辑 /usr/lib/systemd/system/nginx.service 写入以下内容
[Unit] Description=nginx - high performance web server After=network.target [Service] Type=forking PIDFile=/var/run/nginx.pid ExecStartPost=/bin/sleep 0.1 ExecStartPre=/usr/sbin/nginx -t -c /usr/local/nginx/conf/nginx.conf ExecStart=/usr/sbin/nginx -c /usr/local/nginx/conf/nginx.conf ExecReload=/usr/sbin/nginx -s reload ExecStop=/usr/sbin/nginx -s stop [Install] WantedBy=multi-user.target |
启动服务
systemctl daemon-reload #重载 systemctl enable nginx #开机启动 systemctl start nginx #运行 |
我们现在可以用 service 或 systemctl 管理 nginx 了
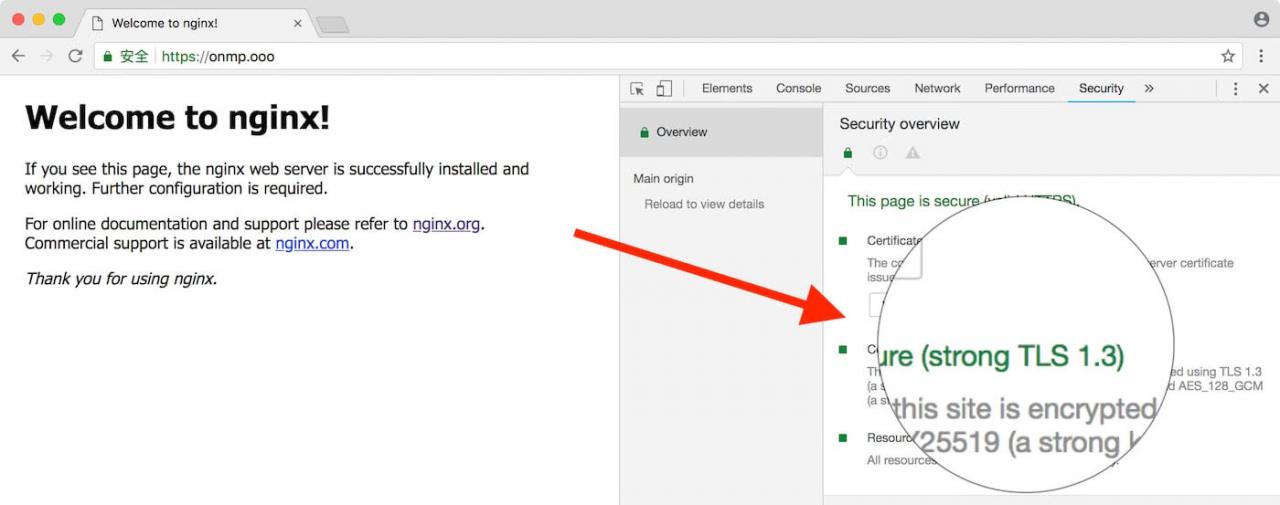
启动 Nginx 后 HTTP 页面就正常了,打开 onmp.ooo 就能看到 Welcome to nginx!
签发证书
配置 HTTPS 首先要有证书,我这里是使用 acme.sh 自动颁发 Let’s Encrypt 的证书
具体使用教程看我的另一篇教程 使用acme.sh获取免费SSL证书
当然,你要是已经有了 SSL 证书,直接看下面配置文件里证书存放的目录,直接放到里面去就行,其他操作一样的
HTTPS 站点配置
因为我给 OpenSSL 打的是 equal-1.1.1_ciphers 补丁,所以 ssl_ciphers 配置文件如下,如果你打的是别的补丁,则需要查看 https://github.com/hakasenyang/openssl-patch 给的配置
server { listen 80; server_name onmp.ooo; return 301 https://onmp.ooo$request_uri; } server { listen 443 ssl http2; server_name onmp.ooo; root /wwwroot/onmp.ooo; # SSL ssl_certificate /usr/local/nginx/conf/ssl/onmp.ooo.cer; ssl_certificate_key /usr/local/nginx/conf/ssl/onmp.ooo.key; ssl_protocols TLSv1.2 TLSv1.3; ssl_ciphers '[TLS13+AESGCM+AES128|TLS13+AESGCM+AES256|TLS13+CHACHA20]:[EECDH+ECDSA+AESGCM+AES128|EECDH+ECDSA+CHACHA20]:EECDH+ECDSA+AESGCM+AES256:EECDH+ECDSA+AES128+SHA:EECDH+ECDSA+AES256+SHA:[EECDH+aRSA+AESGCM+AES128|EECDH+aRSA+CHACHA20]:EECDH+aRSA+AESGCM+AES256:EECDH+aRSA+AES128+SHA:EECDH+aRSA+AES256+SHA:RSA+AES128+SHA:RSA+AES256+SHA:RSA+3DES'; ssl_ecdh_curve X25519:P-256:P-384; ssl_prefer_server_ciphers on; ssl_session_cache shared:SSL:50m; ssl_session_timeout 1d; ssl_session_tickets on; # OCSP Stapling ssl_stapling on; ssl_stapling_verify on; resolver 119.29.29.29 8.8.8.8 valid=300s; resolver_timeout 10s; # Security headers add_header X-Frame-Options "SAMEORIGIN" always; add_header X-XSS-Protection "1; mode=block" always; add_header X-Content-Type-Options "nosniff" always; add_header Referrer-Policy "no-referrer-when-downgrade" always; add_header Strict-Transport-Security "max-age=31536000; includeSubDomains; preload" always; location / { index index.html; http2_push /style.css; } location ~ .*\.(gif|jpg|jpeg|png|bmp|swf|ico)$ { expires 30d; } location ~ .*\.(js|css)?$ { expires 15d; } } |
以上就是完整的站点配置文件,覆盖 /usr/local/nginx/conf/vhost/onmp.ooo.conf 后,使用 service nginx reload 重载 Nginx 再打开站点就能看到 HTTPS 的页面了
验证
在 Chrome 65 或更新的版本中,打开开发者工具的 Security 菜单,就能在里面看到 站点是否以 TLS1.3 连接
或者可以到 SSL Server Test:https://www.ssllabs.com/ssltest/index.html 进行测试
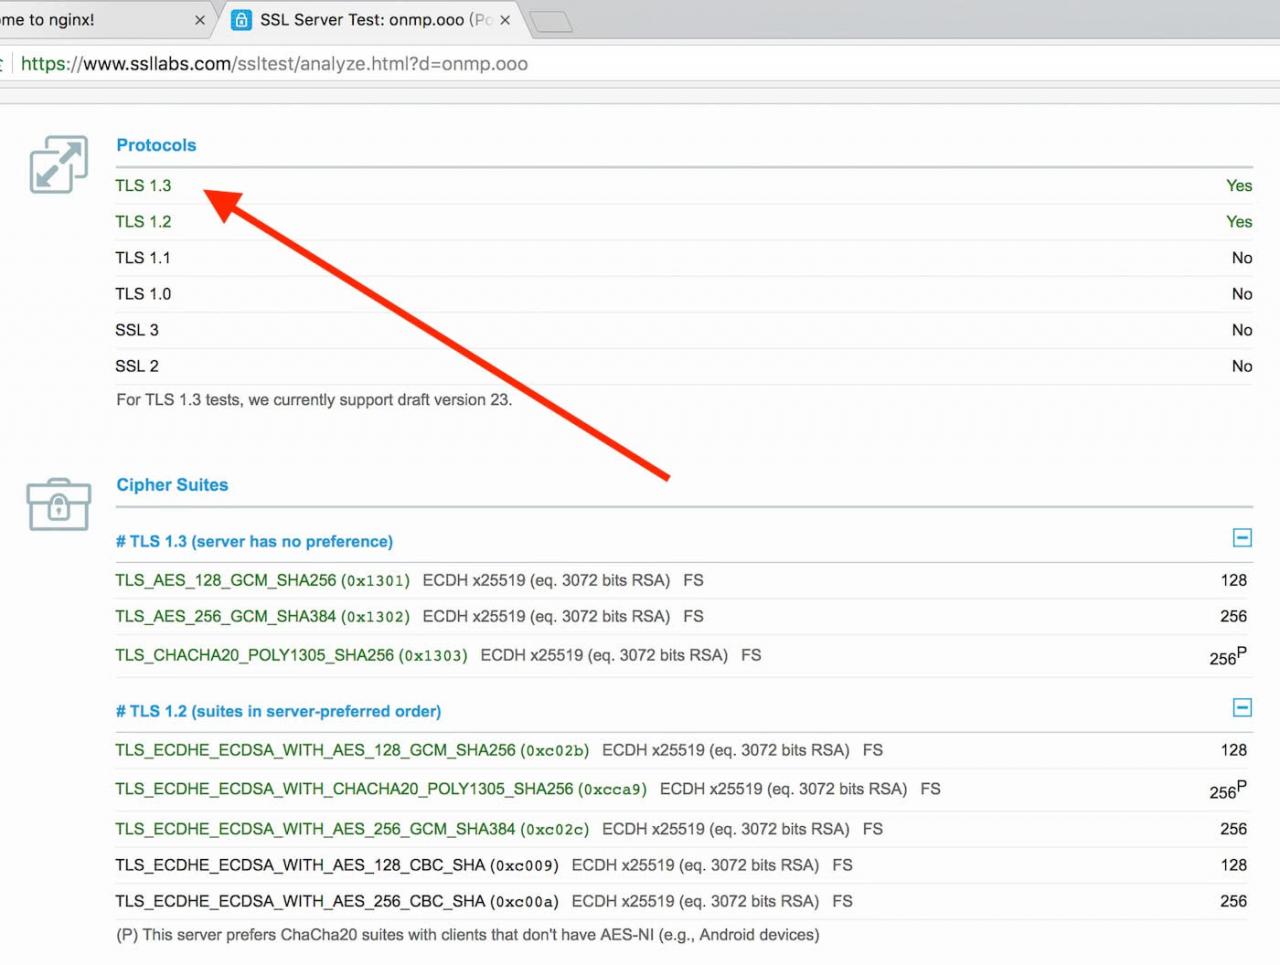
我只开启了 TLSv1.2 TLSv1.3 的支持,如果需要,你可以自己增加其他协议的支持
结语
人们的生活已经离不开网络,所以网络安全在现在和未来都至关重要,曾经很多站长都以 HTTPS 影响站点速度为由,又或者说 SSL 证书昂贵,拒绝配 HTTPS,而随着技术的迭代升级,配置 HTTPS+HTTPS2 能提高网站速度,而 SSL 不仅可以免费获取,还可以使用命令自动获取自动更新,在我看来已经没有理由不配置 HTTPS 了,所以希望各位站长,都赶紧上车吧
本文章发表于底噪博客 https://zhih.me , 转载请注明